

Raspberry Pi has received the
lion's share of attention devoted to cheap, single-board computers in
the past year. But long before the Pi was a gleam in its creators' eyes,
there was the Arduino.
Unveiled in 2005, Arduino boards don't have the CPU horsepower of a
Raspberry Pi. They don't run a full PC operating system either. Arduino
isn't obsolete, though—in fact, its plethora of connectivity options
makes it the better choice for many electronics projects.
While the Pi has 26
GPIO (general purpose input/output) pins that can be programmed to
do various tasks, the Arduino DUE (the
latest Arduino released
in October 2012) has 54 digital I/O pins, 12 analog input pins, and
two analog output pins. Among those 54 digital I/O pins, 12 provide
pulse-width modulation (PWM) output.
This array of inputs and outputs proves crucial in projects from
building robots to 3D printers, said Jason Kridner, co-creator of the
BeagleBone line of products that combine Raspberry Pi-like horsepower
with Arduino-like capabilities.
Pulse-width modulation, for example, is important for driving motors
in particular directions and telling them how fast to go, Kridner recently
explained to Ars. "If you wanted to do that with a Raspberry Pi,
you'd essentially have to add an Arduino," he said.
Last December, we featured 10
of the most amazing Raspberry Pi projects, including arcade
cabinets, robotics, and a wearable computer. This one goes to 11—as in,
we'll show you 11 awesome things hackers and electronics enthusiasts
have created with the Arduino.
These projects take some serious skill—and, in a couple cases, a
disregard for one's own safety.
Giving “sight” to the blind with Arduino and the human
tongue
Tongueduino.
When a person loses the ability to see, the senses of hearing, touch,
and smell are relied on even more to navigate one's surroundings. But
the tongue could be used for the same purpose, with the help of an
Arduino-fueled contraption called the Tongueduino.
Devised by MIT researcher Gershon Dublon, Tongueduino sends
information to a pad that has electrodes spread across a grid. This pad
is placed into the user's mouth. "When hooked up to an electronic
sensor, the pad converts signals from the sensor into small pulses of
electric current across the grid, which the tongue 'reads' as a pattern
of tingles," New Scientist reported
in February.
"The tongue is known to have an extremely dense sensing resolution as
well as a high degree of neuroplasticity, the ability to adapt to new
input," according to the MIT Media Lab video embedded above. "Research
has shown that electrotactile tongue displays can be used as vision
prosthetics for the blind. Users quickly learn to read and navigate
through natural environments."
With Tongueduino, "[s]ignals map spatially and intensity maps to the
number of pulses within a frame," the video states. In one example, a
Tongueduino user is able to identify the pixels and lines drawn on a 3x3
grid by a colleague on a computer across the room.
The ultimate goal is to move beyond simple vision replacement toward
greater sensory augmentation. A connection to a magnetometer could
provide a user with "an internal sense of direction, like a migratory
bird."
Dublon spent a year testing Tongueduino on himself. Having honed the
design and upgraded the pad from a 3×3 grid to a 5×5 grid, he is now
beginning to test it on a dozen volunteers.
Exterminate, annihilate, destroy! (Yes, it’s a Dalek)
This one goes out to all the Doctor Who fans. Perhaps the
Doctor's most iconic enemy, the alien mutants in robotic shells known as
Daleks are simultaneously terrifying and hilarious.
Who fan Andy Grove set
out to build one, smartly combining the Raspberry Pi and Arduino:
I have used an Arduino Uno to monitor two ultrasonic
sensors in the base of the Dalek and send the results over the USB
serial interface to a Raspberry Pi which then plays an MP3 clip. I used a
separate Arduino board to provide sound to light functionality to drive
the dome lights.
I could have achieved the results I needed using just the Arduino or
the Raspberry Pi but it seems to me that the Arduino is better suited to
low-level functions interacting directly with sensors and motors and so
on, whereas the power of the Raspberry Pi is that it is a fully
functional Linux computer for tasks requiring more computational power,
and where I can easily use existing skills to leverage the Internet
later on. Eventually I plan to put motors in the dome and a webcam in
the eye so that the Dalek can look directly at people that approach. I
also want to have a Web interface to be able to control behavior.
Putting together the electronics was faster than building the bulk of
the robot, made mostly of plywood, cardboard, and papier-mâché. Grove
got the Dalek ready for this past Halloween, saying "[t]he construction
took five months, with some time spent working on it almost every
weekend."
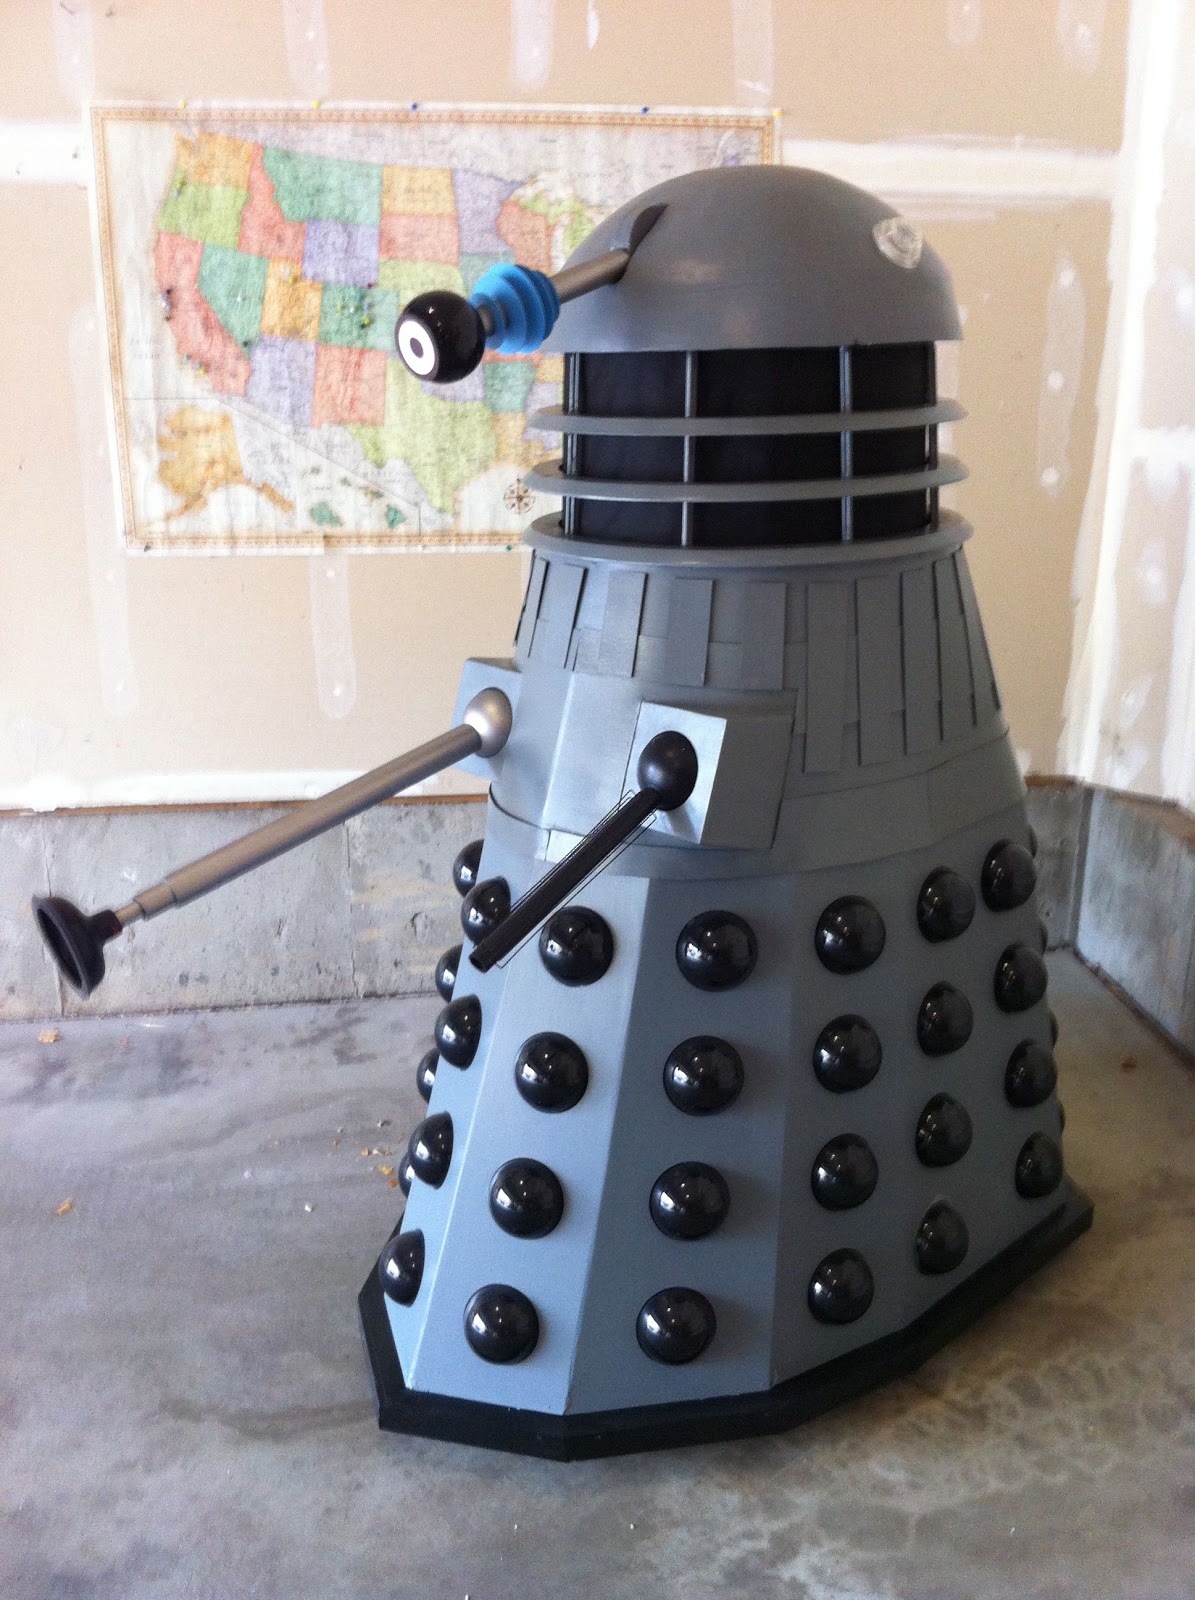
The finished Dalek was absolutely worth the effort. Not only does it
look like a Dalek, it's also able to utter the evil robot species' evil
catch phrase:
For those of you who don't watch Doctor Who and wonder why
anyone would spend so much time building a Dalek, here's your answer:
Dalek
destruction.
A 3D-printed flying quadcopter drone
3D
printing and flying drones are among the two most popular
activities for Arduino owners. Here we have a project that combines both
activities into one.
Numerous people have purchased quadcopter drones and then outfitted
them with Arduino-based control systems. Instead of just buying a
quadcopter, a team at the University of Victoria in British Columbia
built one from scratch using parts spewed out by a 3D printer.
The parts fit together like this:
Quadcopter 3D printed parts.
But there was more work to be done after that, which is where the
Arduino and a "9
Degrees of Freedom" sensor stick entered the picture.
The quadcopter project team explains
its work here:
The 9 Degrees of freedom sensor stick (9DOF) contains
three sensors: an accelerometer, a gyroscope, and a magnetometer. Each
sensor can be communicated with using I2C from
analog pins 4 and 5 on the Arduino Uno. We powered the sensor stick
using the 5 volts out available on the Arduino Uno. I2C also requires
pull-up resistors on the data (SDA) and clock (SCL) buses. We used two
pull up resistors soldered to the 5 volt output of the Arduino shield
and SCL/SDA. To prevent the sensor from receiving too much noise during
flight, the sensor was soldered to an Arduino ProtoShield on the pins.
The other end of the 9DOF was glued to the shield. The source code for
the project is based on the AeroQuad [open source
quadcopter].
And yes, the 3D-printed, Arduino-powered quadcopter did take flight.
Here it is:
Quadcopter
test flight.
